MCP server by elhadik
Retail Multi-Agent Orchestration Hub
The Retail Multi-Agent Orchestration Hub is a premium, state-of-the-art pilot portal demonstrating a conversational AI interface coupled with an interactive sandbox canvas. The system coordinates pricing analytics, cohort construction, audience sizing, and marketing activations across a hybrid multi-agent network.
1. System Architecture
The portal is built on a Supervisor-Orchestrator model consisting of a central web application layer directing tasks to specialized agent microservices:
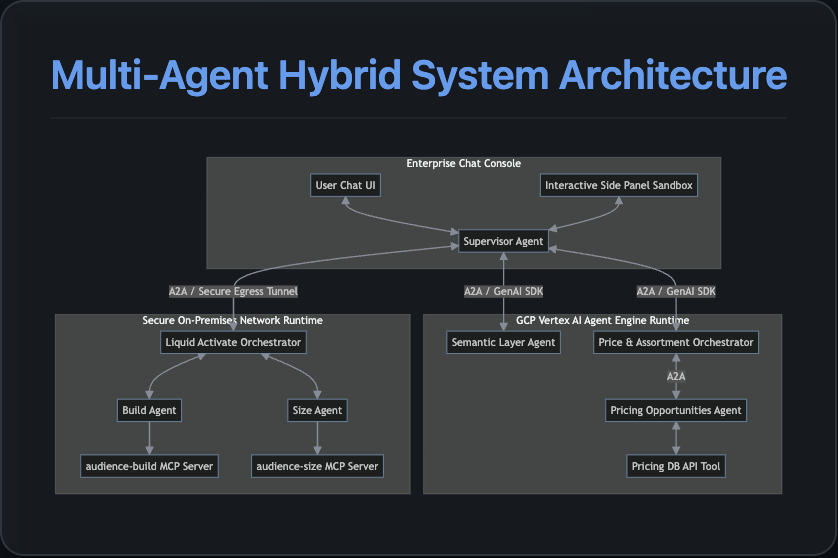
Core Components
- Supervisor (PilotSupervisor): Runs inside the local FastAPI backend. It serves as the primary conversational dispatcher, translating user intents into orchestration tasks and executing UI callbacks.
- Pricing Agent (PricingAssortmentOrchestrator): Analyzes retail product catalog sales volume changes and buyer attrition to identify pricing opportunities.
- Activation Agent (LiquidActivateOrchestrator): Constructs, scales, and sizes custom audience segments (e.g., lapsed buyers of Diet Pepsi), and handles activation exports to marketing partners.
- Loyalty Agent (LoyaltyCampaignOrchestrator): Designs and creates personalized loyalty card campaign offers for target shopper cohorts.
2. A2A and A2UI Protocols
The application relies on two key architectural specifications from the Agent Development Kit (ADK):
A2A (Agent-to-Agent) Protocol
Conversations across different agents are structured using the standard A2A message formatting. Communication between the supervisor and sub-agents happens via:
- GenAI SDK Reasoning Engine Client: Resolves the Remote Reasoning Engine in the cloud and executes the task.
- Simplified JSON Payload: Sub-agents return data packages natively inside A2A
DataPartstructures rather than raw text, keeping LLM communication clean and structured.
A2UI (Agent-to-User-Interface) Protocol
To enable interactive widgets (tables, check-boxes, and buttons) inside the portal, the system utilizes the A2UI Protocol:
- Sub-agents return a structured layout definition under the
<a2ui-json>schema. - The supervisor intercepts these payloads and binds them to the frontend widget area.
- Dynamic Template Expansion: To prevent remote LLM copy-paste degradation or formatting errors, the supervisor uses local templates (
web_app/components.py) to wrap simple JSON data structures into robust, premium HTML-styled widget packages before passing them to the browser sandbox.
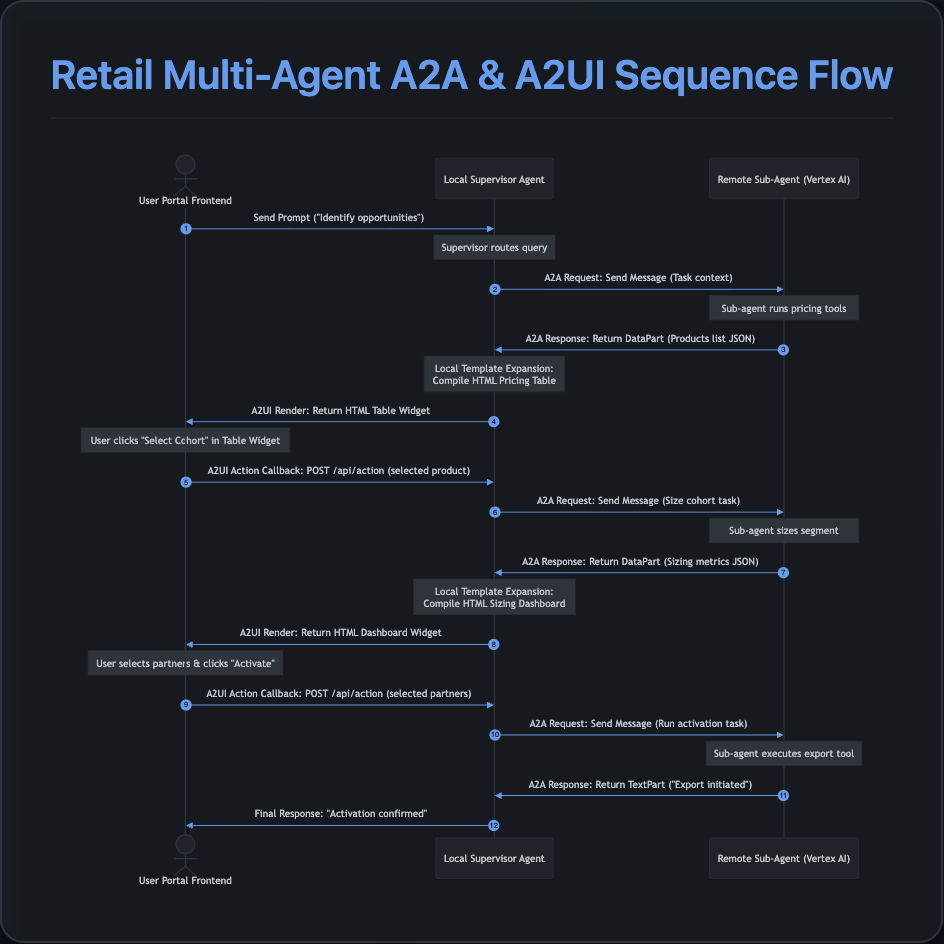
3. Human-in-the-Loop (HITL) Flow
To prevent AI from executing critical actions asynchronously without supervision (e.g., spending advertising budgets or triggering bulk cohorts exports), the portal implements a strict Human-in-the-Loop (HITL) interaction model using ADK / A2UI interactive callbacks:
- Checkpoint Interrupt: When a sub-agent executes a task that requires user confirmation, it returns a structured interactive layout instead of proceeding automatically.
- Interactive Rendering: The frontend renders this layout as an interactive widget (e.g., checkboxes for LiveRamp and Google Ads, or a "Select Cohort" action button in a products table).
- Execution Pause: The LLM's turn completes, leaving the portal in an idle state awaiting user action.
- Resuming via Action Callback: When the user clicks a button or checks a partner box, the frontend triggers a
USER_ACTIONpayload sent to the/api/actionendpoint. - Context Ingestion: The backend server captures the callback variables, translates them into a clear semantic prompt describing the user's action (e.g.,
"Action received: activate the segment on channels: LiveRamp. Proceed to export."), and starts a new agent run context to execute the confirmation.
4. Step-by-Step Deployment Guide
Prerequisites
- Python 3.10+
- Google Cloud SDK configured with authentication.
- Access to Vertex AI Reasoning Engine permissions.
Step 1: Environment Configuration
Create a .env file in the root directory:
GOOGLE_GENAI_USE_VERTEXAI=true
GOOGLE_CLOUD_PROJECT=your-project-id
GOOGLE_CLOUD_LOCATION=us-central1
GOOGLE_GENAI_MODEL=gemini-2.5-flash
PROJECT_ID=your-project-id
STORAGE_BUCKET=gs://your-agent-staging-bucket
Step 2: Deploy Orchestration Agents to Vertex AI
Navigate to the agents folder and run the deployment script:
cd agents
export $(cat ../.env | xargs)
PYTHONPATH=. ../.venv310/bin/python3 ../deploy.py
Upon completion, the deployment output will display the Reasoning Engine resource IDs. Update your .env file with these values for remote cloud resolution:
# Remote Cloud Deployment Endpoint Format:
PRICING_AGENT_URL=projects/your-project-id/locations/us-central1/reasoningEngines/your-engine-id-1
ACTIVATE_AGENT_URL=projects/your-project-id/locations/us-central1/reasoningEngines/your-engine-id-2
LOYALTY_AGENT_URL=projects/your-project-id/locations/us-central1/reasoningEngines/your-engine-id-3
Alternatively, if you run the sub-agents locally (for faster iteration loops using local A2A servers), configure your .env to point to the local server ports:
# Local Development Endpoint Format:
PRICING_AGENT_URL=http://localhost:10102
ACTIVATE_AGENT_URL=http://localhost:10103
LOYALTY_AGENT_URL=http://localhost:10104
Step 3: Run the Local Web Application Portal
Start the FastAPI server from the project root:
python3 -m uvicorn web_app.server:app --host 127.0.0.1 --port 8000
Open your browser and navigate to http://127.0.0.1:8000.
4. Preparing for Git Commit & Repo Push
To clean up temporary files, virtualenv environments, and deployment logs before committing the code to a GitHub repository, a .gitignore has been prepared.
Deleting Unnecessary Directories (lib_ref / scratch)
lib_ref/: This directory was used as a reference copy of the experimental library files and is no longer needed since packages are imported directly from.venv310/. It can be safely deleted.scratch/: Contains developer playground scripts and local process managers. If you want a clean repository, you can remove this directory.
.gitignore Setup
Ensure the following entries are present in your .gitignore to prevent committing secrets or build artifacts:
# Byte-compiled / optimized / DLL files
__pycache__/
*.py[cod]
*$py.class

# Environments
.venv/
.venv310/
env/
venv/
ENV/

# Configuration and Secrets
.env
*.gcloud/

# OS-specific
.DS_Store
Thumbs.db
5. End-to-End Execution Flow & UI Walkthrough
The following sections illustrate the sequence of prompts, agent transitions, and interactive visual widgets displayed during the orchestration flow.
Step 1: Initial Portal View
When you open the web application, you are greeted by the branded Orchestration Hub console.
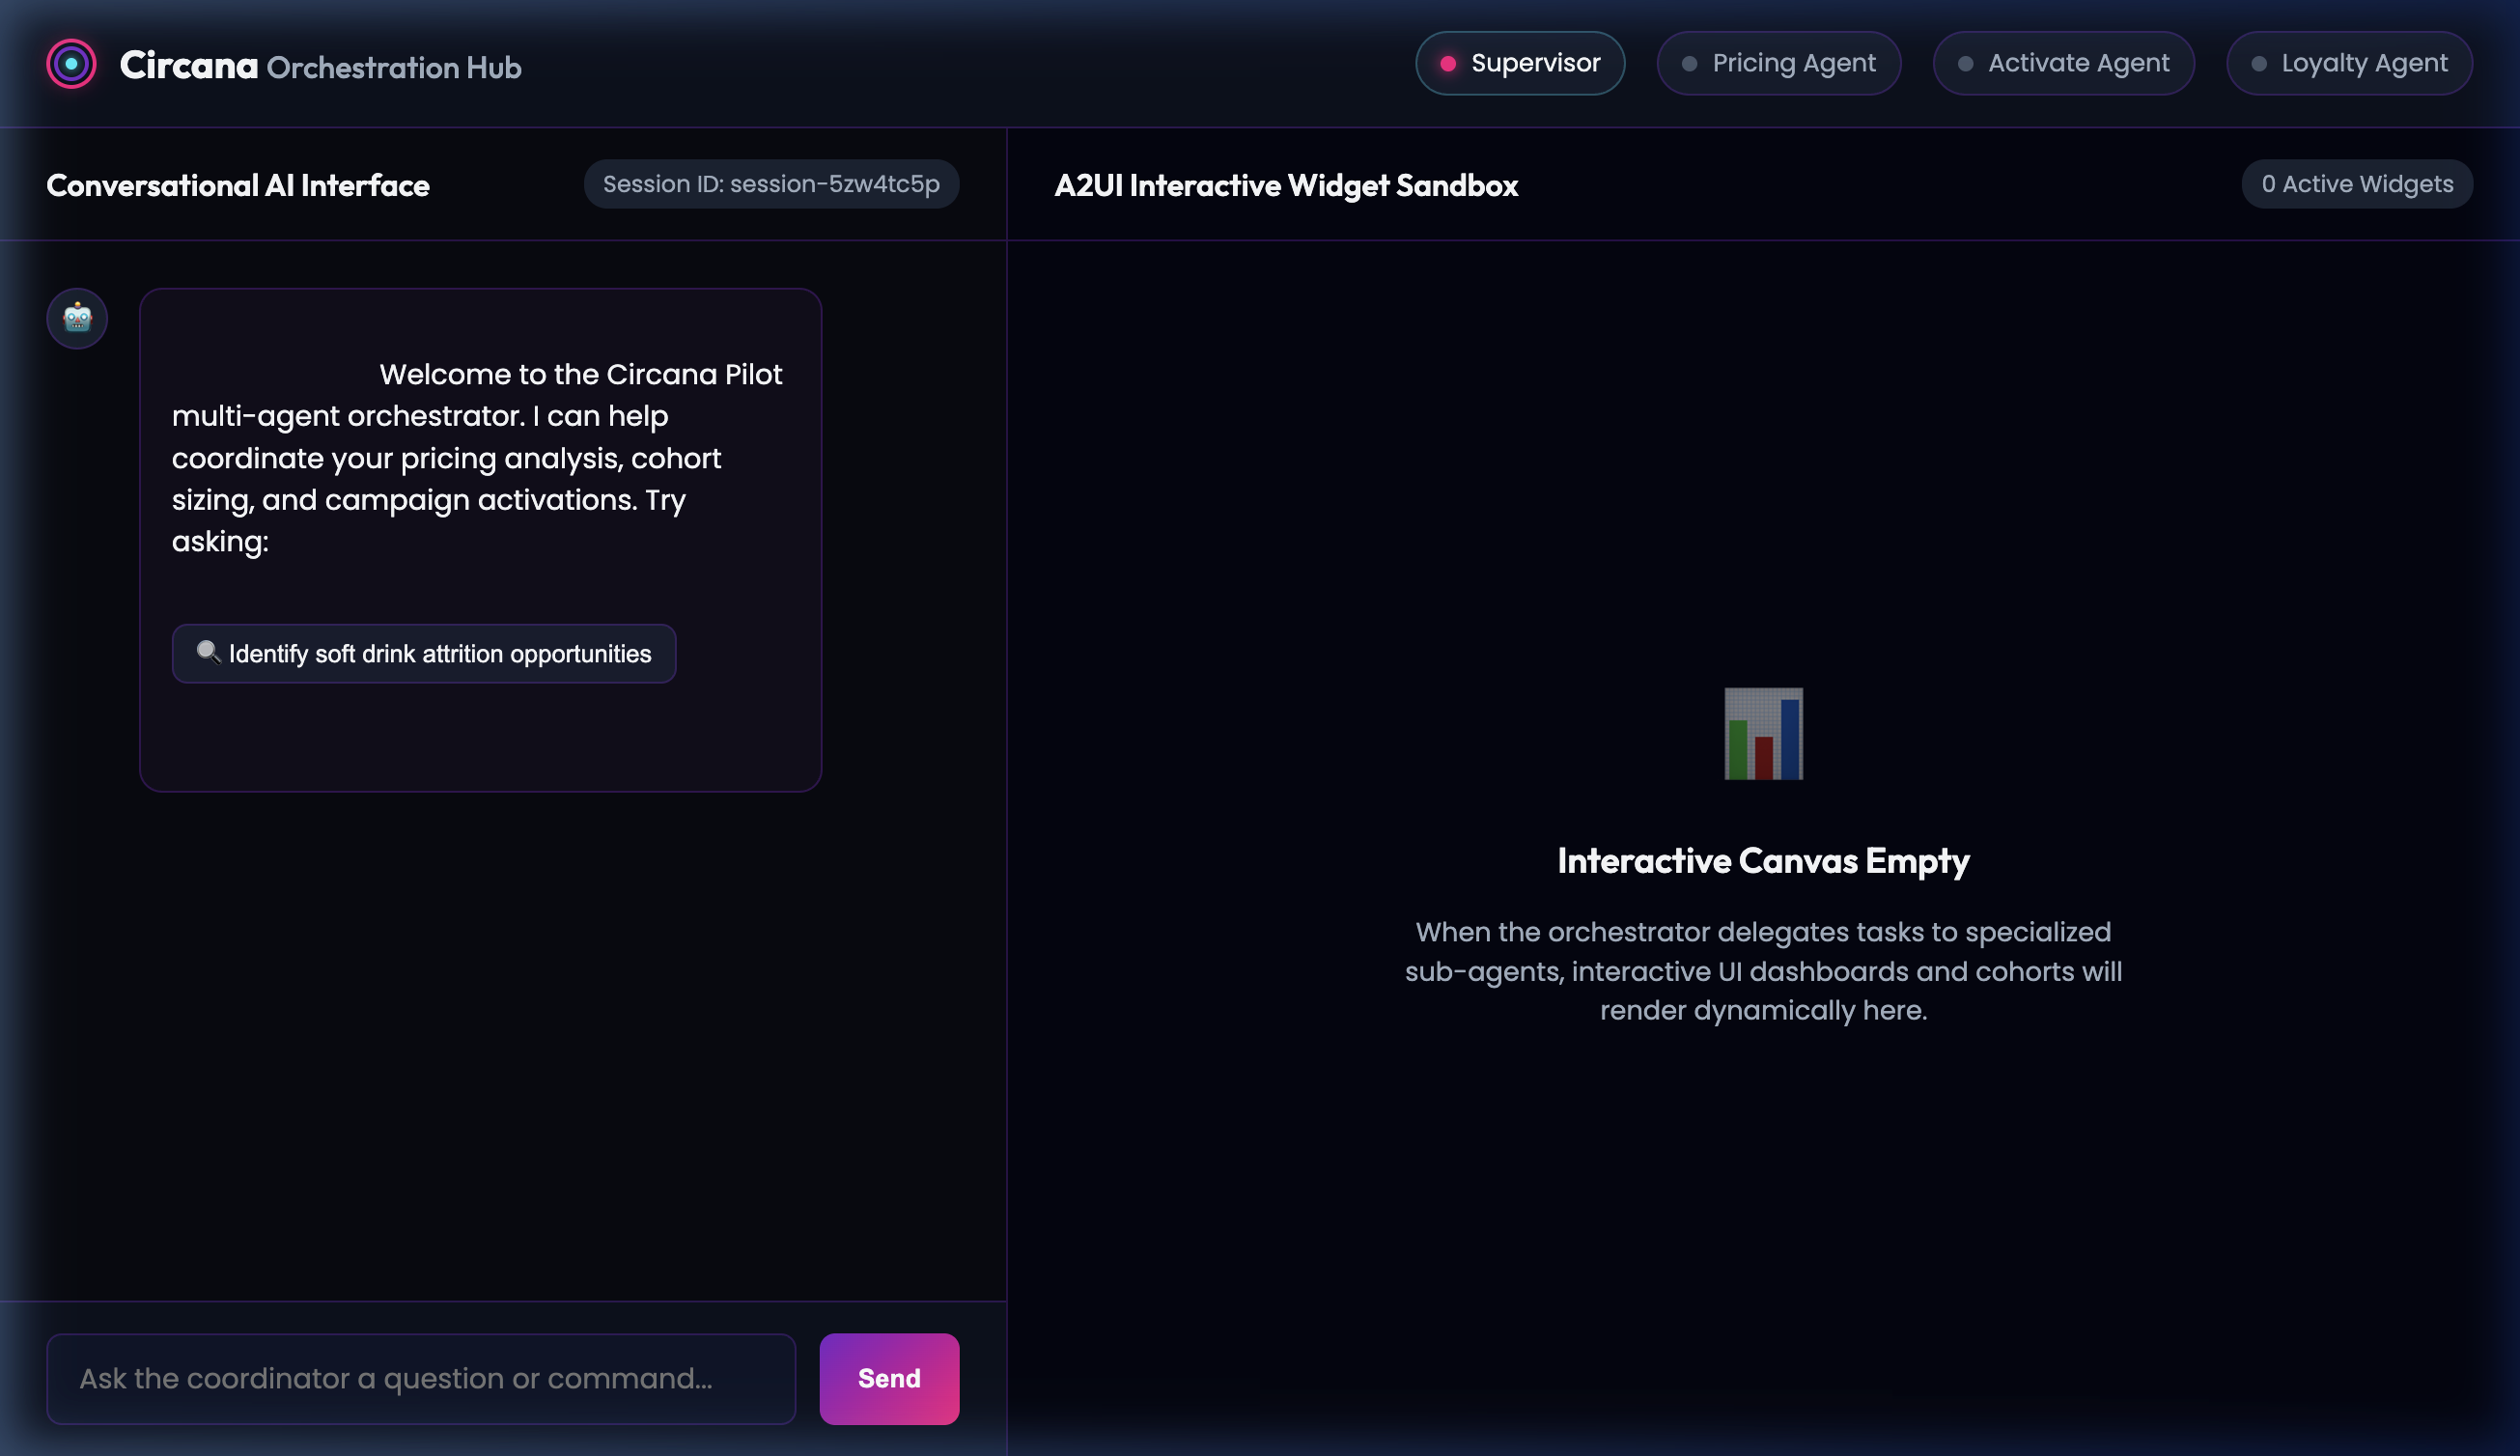
- Sample User Prompt / Trigger: Click the suggestion pill
🔍 Identify soft drink attrition opportunities.
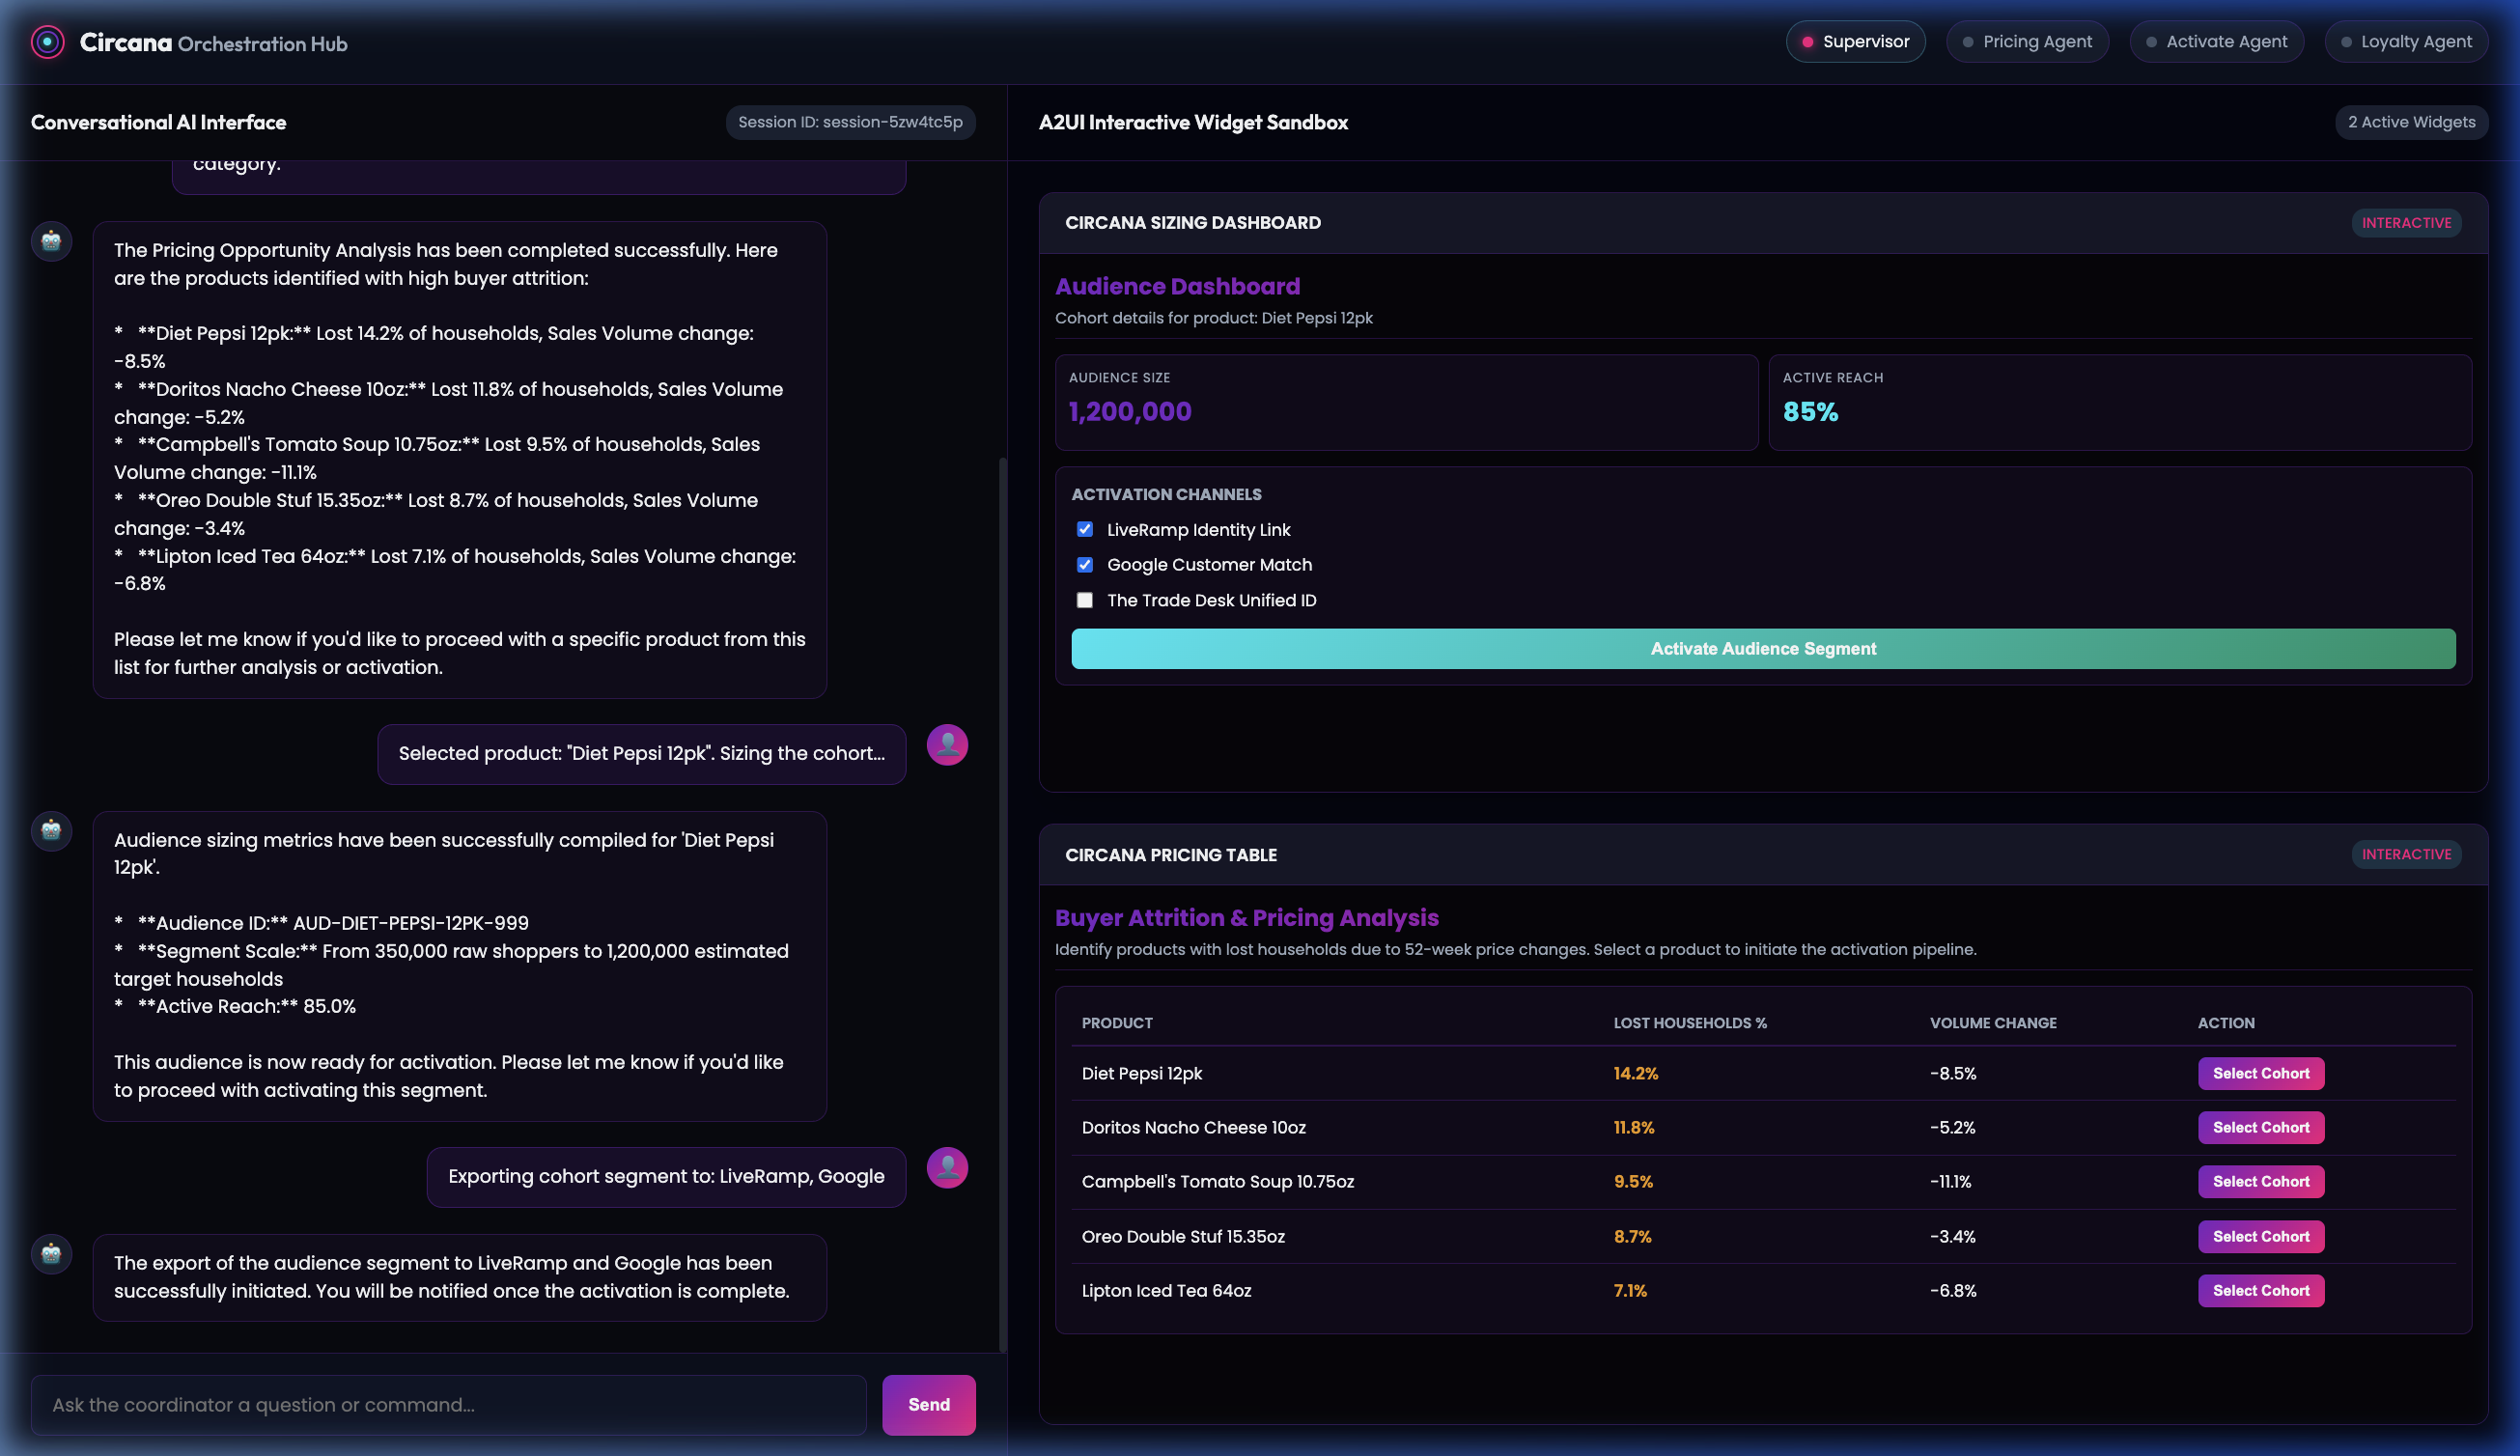
Step 2: Attrition & Pricing Analysis Widget
The Local Supervisor delegates the request to the Remote PricingAssortmentOrchestrator, which returns a detailed breakdown of lost households. The supervisor renders this list as an interactive Pricing Table widget in the sandbox panel.
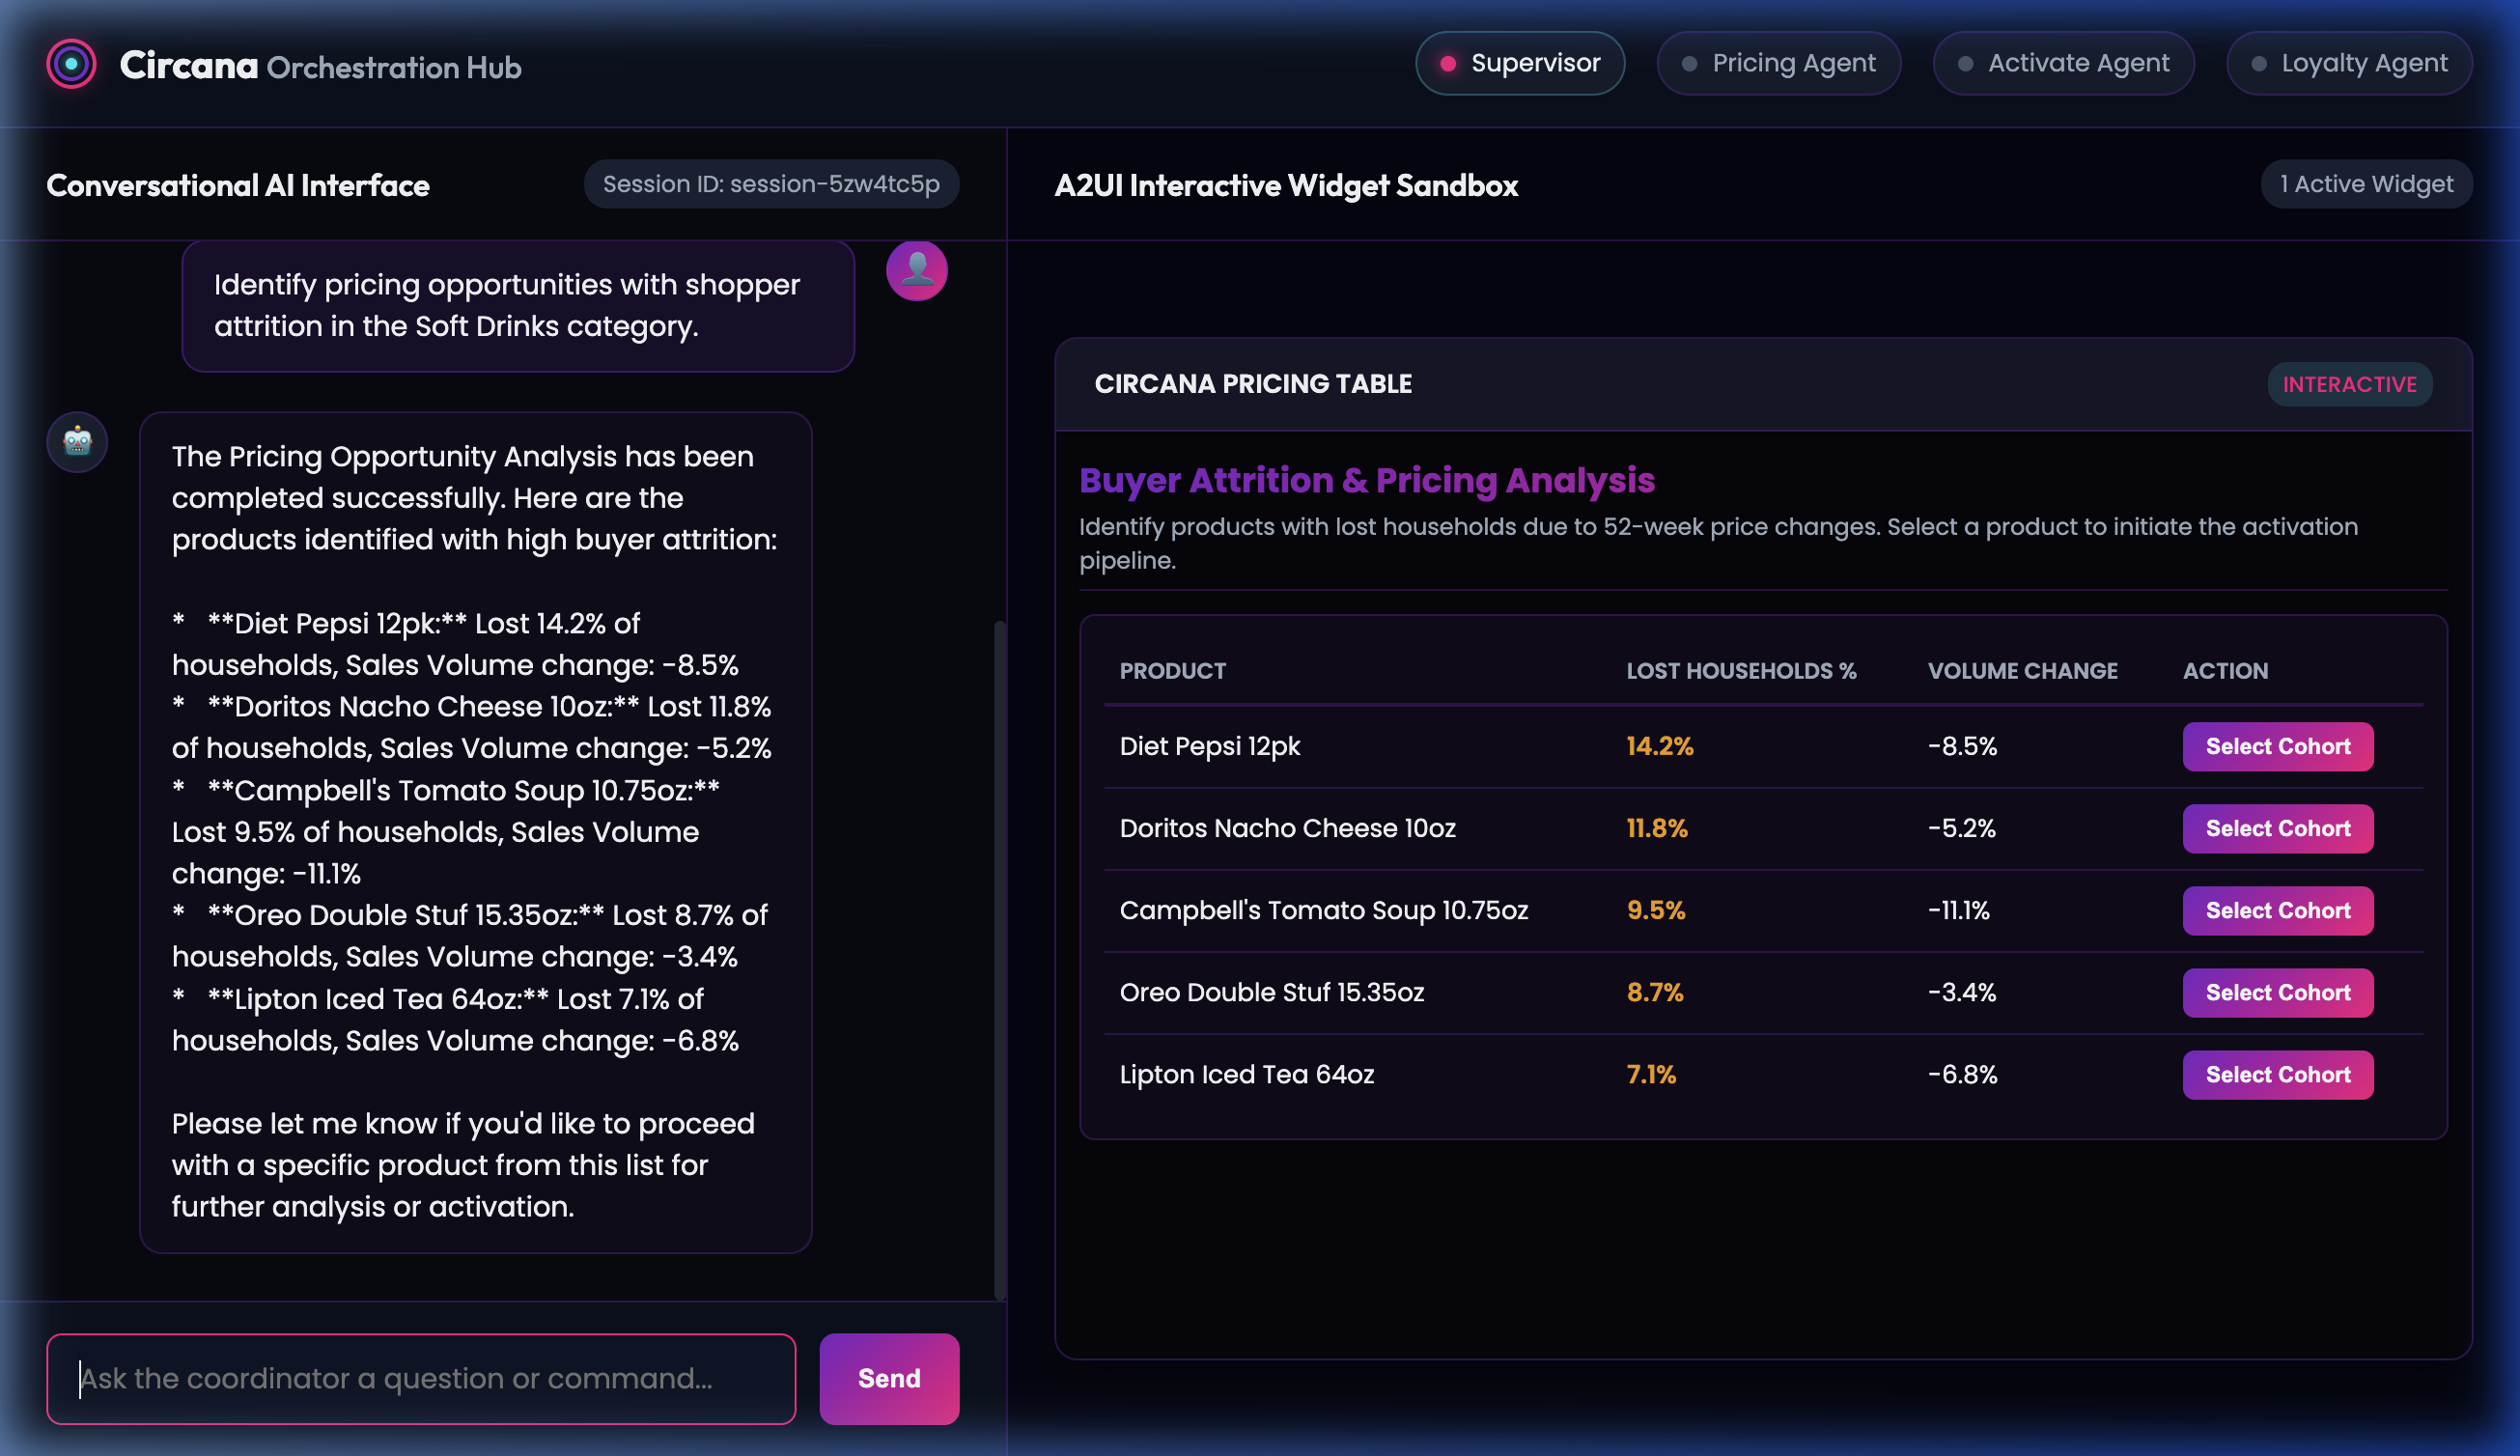
- Sample User Prompt / Action: Inside the table widget, click the Select Cohort button for
Diet Pepsi 12pk. This dynamically posts the action callback payload back to the Supervisor Agent.
Step 3: Audience Sizing Dashboard
The Supervisor routes the selection to the Remote LiquidActivateOrchestrator to scale the segment. The sub-agent returns the audience scale and reach details, which are formatted into a card dashboard.
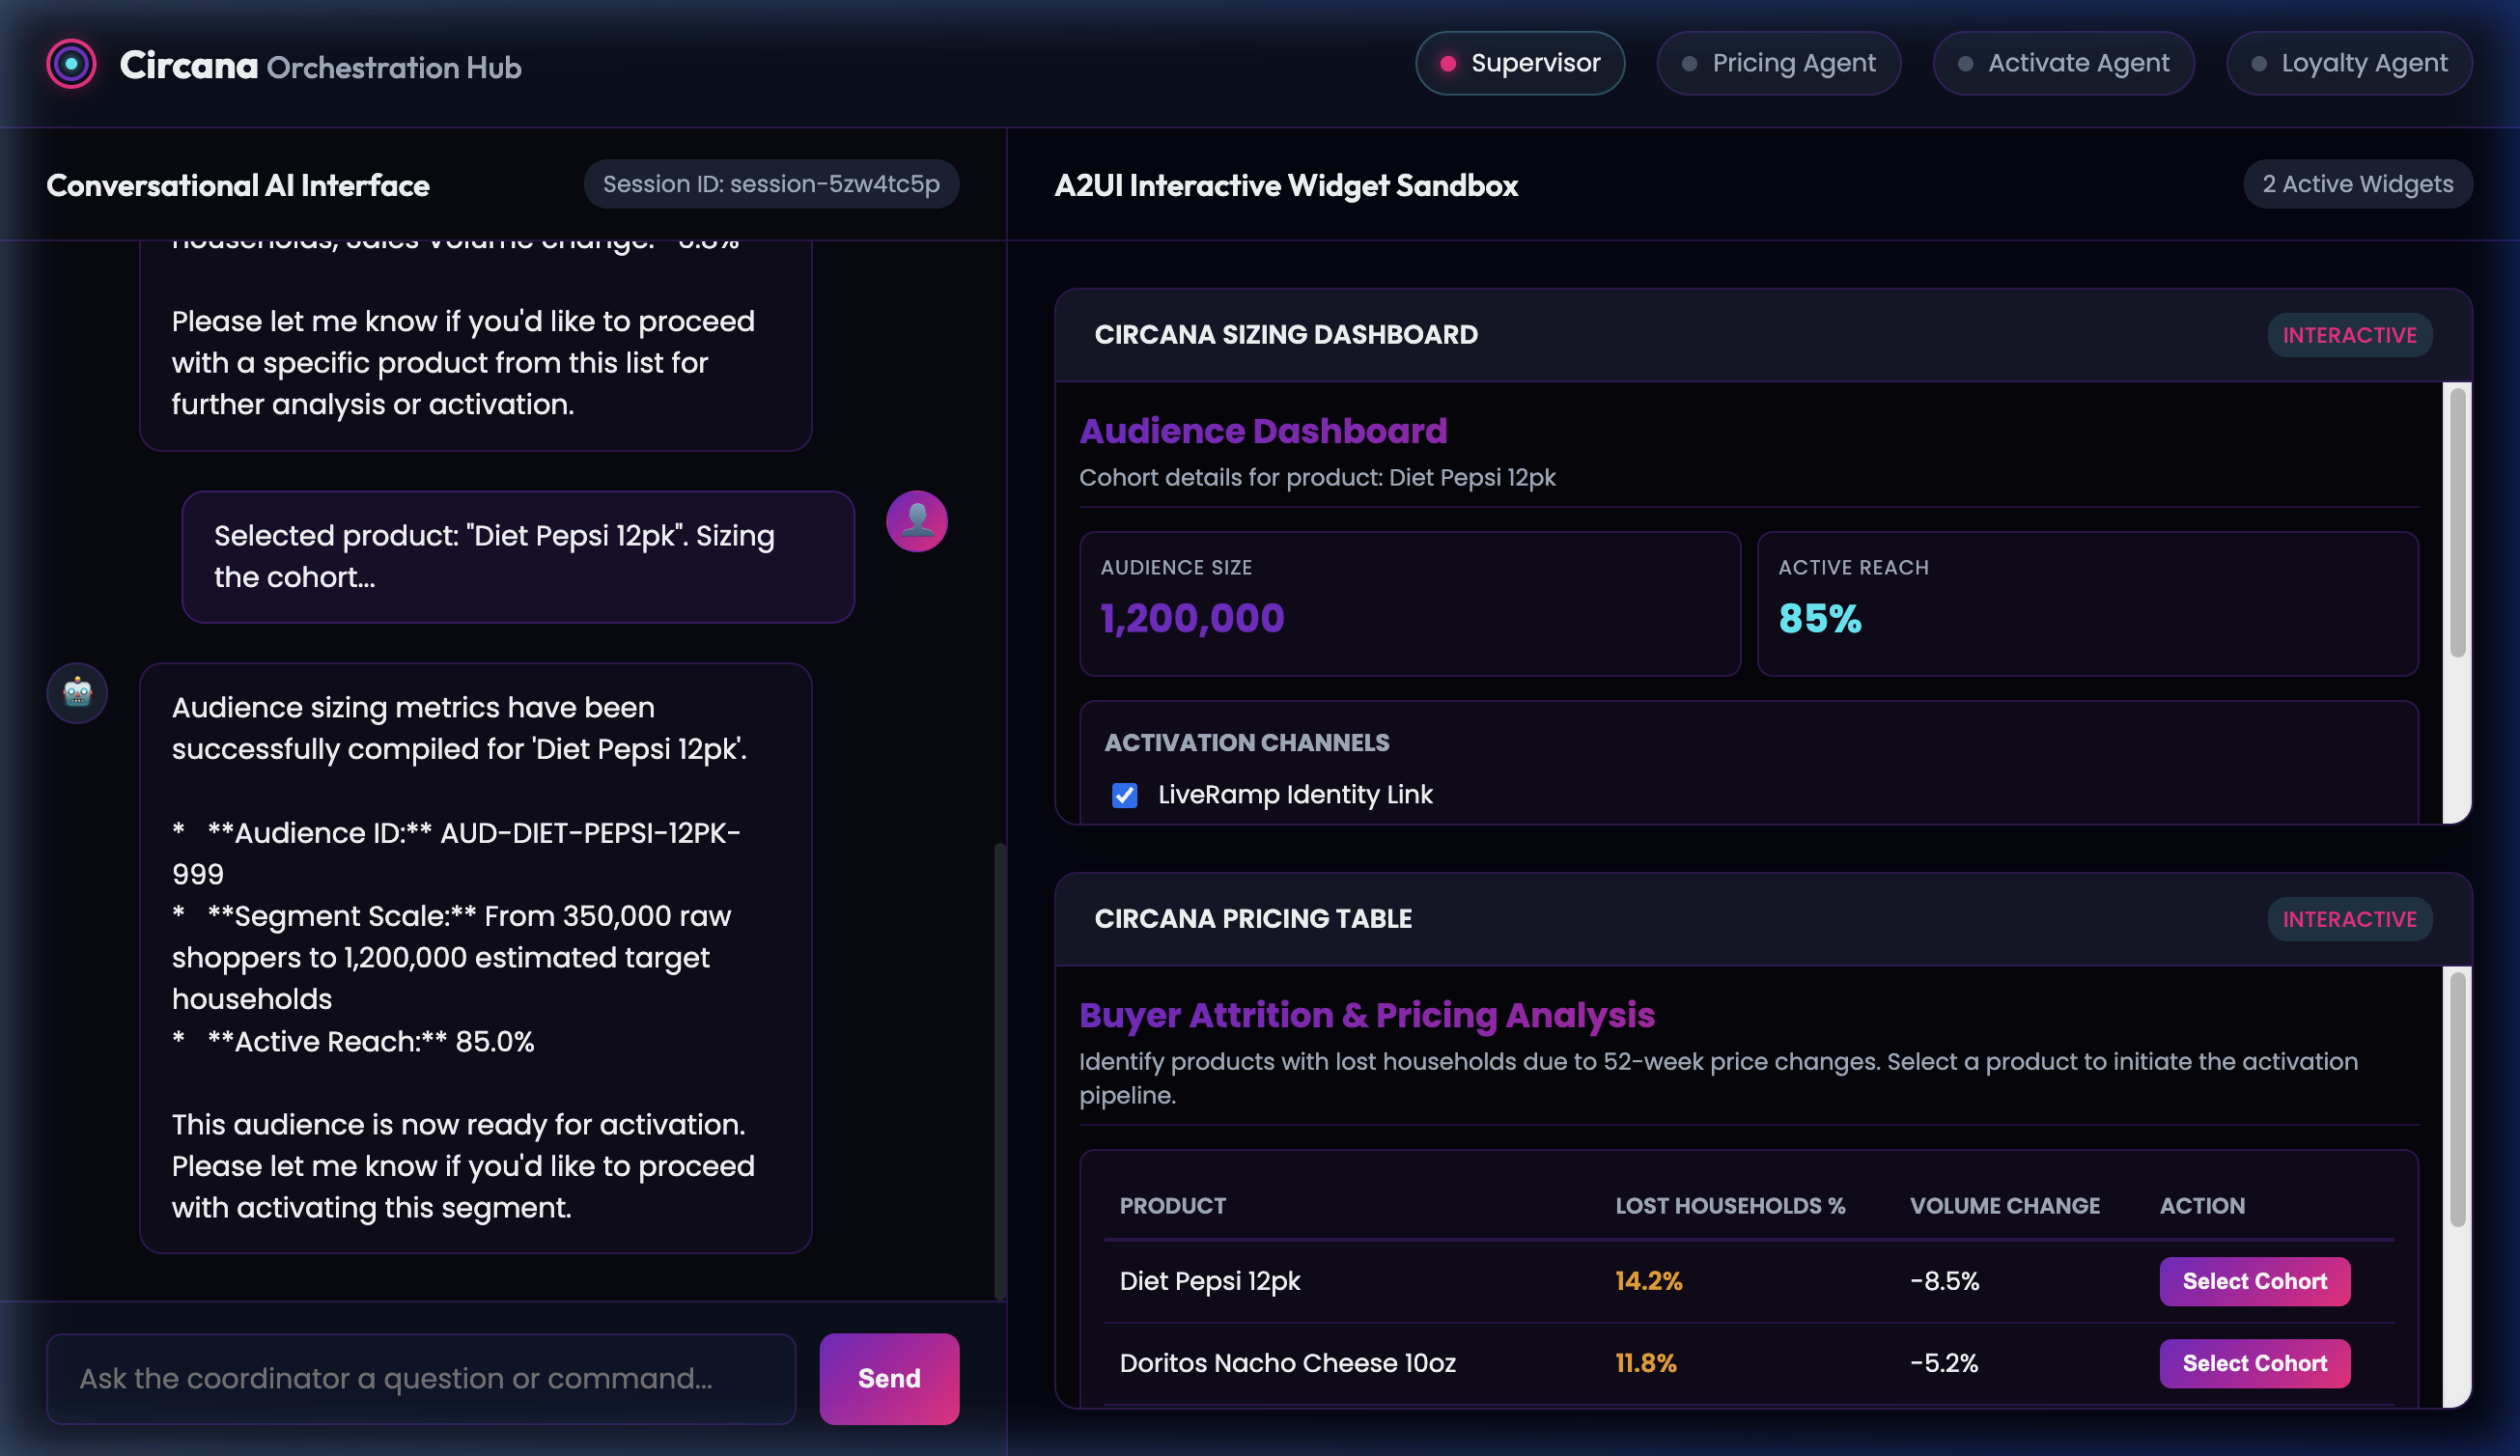
- Sample User Prompt / Action: Check
LiveRamp Identity LinkandGoogle Customer Matchcheckboxes, and click the Activate Audience Segment button.
Step 4: Final Activation Success
The Supervisor triggers the export API and returns a final text confirmation of the audience synchronization to external partners.