支持andorid、iOS、Windows、macOS实时的时间线上传,预留了一个测试的视奸网站与api调用文档以方便在自己的静态页面上自定义(就不需要服务器部署整个web了),还有供各个Agent连接调用的MCP,以及app的自定义语言
device-timeline-mcp
English | 中文
Self-hosted, multi-device activity timeline collector with a built-in MCP server.
It tracks what app you're using, on which device, right now across Android, iOS, Windows and macOS, stores it in a single SQLite database, and exposes it three ways:
- a read-only HTTP API (for your own status pages / frontends),
- a web console for eyeballing the data,
- an MCP server so an AI assistant (Claude Desktop, Claude Code, …) can answer "what is he doing right now?" / "how much time on B站 today?".
Single-user, self-hosted, no account system. You run one collector; each of your devices reports to it with its own token.
Architecture
┌─────────────┐   HTTPS POST /api/devices/report (Bearer token)
│  reporters  │ ───────────────────────────────────────────────┐
│ android/ios │                                                 ▼
│ windows/mac │                                         ┌──────────────────┐
└─────────────┘                                         │  collector       │
                                                        │  (this service)  │
┌─────────────┐   GET /api/devices/* (read-only)        │  Fastify+SQLite  │
│ your web UI │ ◀──────────────────────────────────────▶│  + /console      │
└─────────────┘                                         └──────────────────┘
                                                                 ▲
┌─────────────┐   stdio (runs on your laptop)                   │ HTTP
│ Claude /    │ ──▶  src/mcp/server.ts  ────────────────────────┘
│ MCP client  │      (device_status / device_timeline / device_activity_summary)
└─────────────┘
The collector runs on a server (Docker). The MCP server is a thin stdio process you run wherever your AI client lives; it just calls the collector's read API.
Quick start (Docker)
git clone <this-repo> device-timeline-mcp
cd device-timeline-mcp
cp .env.example .env
# edit .env → generate a token per device (see below)
docker compose up -d --build
Open http://<host>:4200/console — you should see your devices appear as they
start reporting. Health check: curl http://<host>:4200/health.
Without Docker (Node ≥ 22.5)
npm install
cp .env.example .env   # edit it
npm run build && npm start      # or: npm run dev
Why Node 22.5+? The collector uses Node's built-in
node:sqlite— no native module to compile.
Device tokens & multi-device naming
Every device authenticates with its own token. Define them in .env under
DEVICE_TOKENS_JSON (or point DEVICE_TOKENS_FILE at a JSON file).
[
  {"token":"<openssl rand -hex 32>","deviceId":"android-phone","deviceName":"我的手机","platform":"android"},
  {"token":"<openssl rand -hex 32>","deviceId":"android-tablet","deviceName":"平板 Y700","platform":"android"},
  {"token":"<openssl rand -hex 32>","deviceId":"windows-pc","deviceName":"台式机","platform":"windows"},
  {"token":"<openssl rand -hex 32>","deviceId":"mac-laptop","deviceName":"MacBook","platform":"macos"},
  {"token":"<openssl rand -hex 32>","deviceId":"ios-phone","deviceName":"iPhone","platform":"ios"}
]
The key idea for "two of the same platform": devices are told apart by
deviceId, not by platform. If you have an Android phone and an
Android tablet (like a typical setup), give them different deviceIds —
e.g. android-phone and android-tablet — each with its own token. They
both have platform: "android" and both land in the same tables; every query
can filter by deviceId, and the console shows them as separate cards.
deviceId: kebab-case, unique, stable. This is the join key — don't change it later.deviceName: free-form display label (shown in the console / MCP output).- Generate each token with
openssl rand -hex 32.
Per-platform reporter setup
The reporters live in reporters/ — each has its own README with build +
setup steps:
| platform | source | notes |
|---|---|---|
| Android | reporters/android | timeline-only Kotlin app (foreground service) |
| Windows | reporters/windows | .NET tray app, single-file exe |
| macOS | reporters/macos | Python + launchd daemon |
| iOS | reporters/ios | Shortcuts automations (no installable app) |
The desktop/Android reporters do the same thing: sample the foreground app + window
title every ~10s and POST /api/devices/report with their Bearer token. All you
configure is the server URL and the device token.
Android (phone & tablet)
Build the APK from reporters/android (Android Studio or
./gradlew assembleRelease), then:
- Install the APK on the device.
- Open it once → grant Usage Access (设置 → 应用 → 特殊权限 → 使用情况访问) and disable battery optimization for it (so it keeps reporting in the background).
- In the app's settings, set:
- Server URL:
https://<your-host>(orhttp://host:4200on LAN) - Token: the token for this device
- Server URL:
- For a phone + tablet, install on both, and paste the phone token on the phone and the tablet token on the tablet. That's the whole distinction.
iOS — Shortcuts automations
iOS has no background reporter; you drive it with two Personal Automations in the Shortcuts app.
A. "App Opened" automation (fires when you open any tracked app):
- New Automation → App → choose the apps to track → Is Opened.
- Action: Get Contents of URL →
POST https://<host>/api/devices/ios/app-eventwith headerAuthorization: Bearer <ios token>and JSON body{"app":"<App Name>","action":"open"}. - Turn off "Ask Before Running".
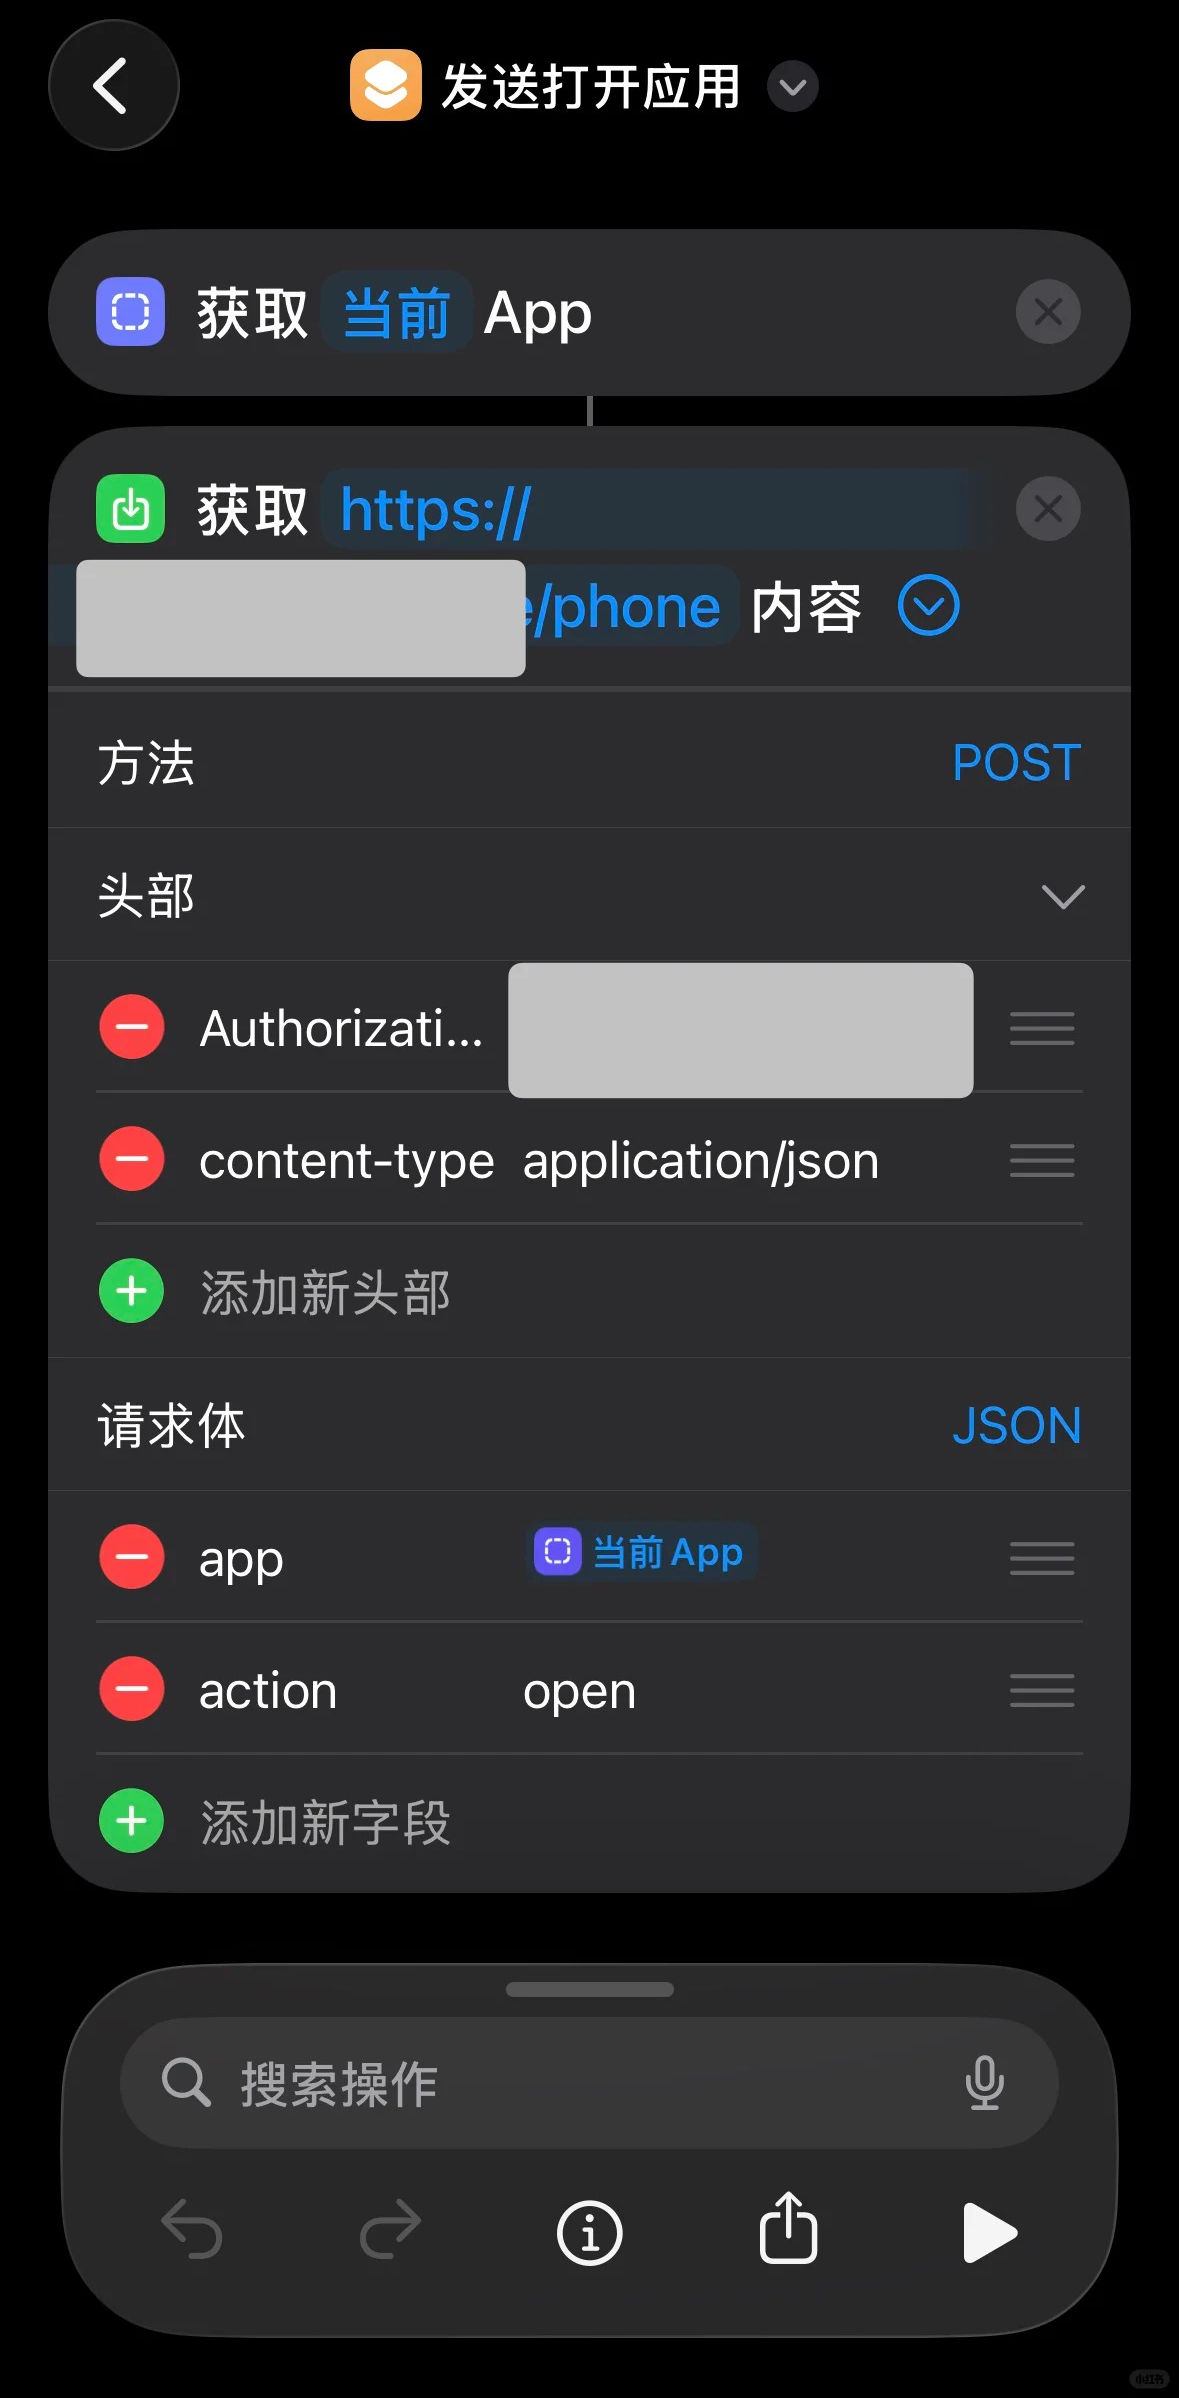
B. "App Closed" automation — same as above with "action":"close".
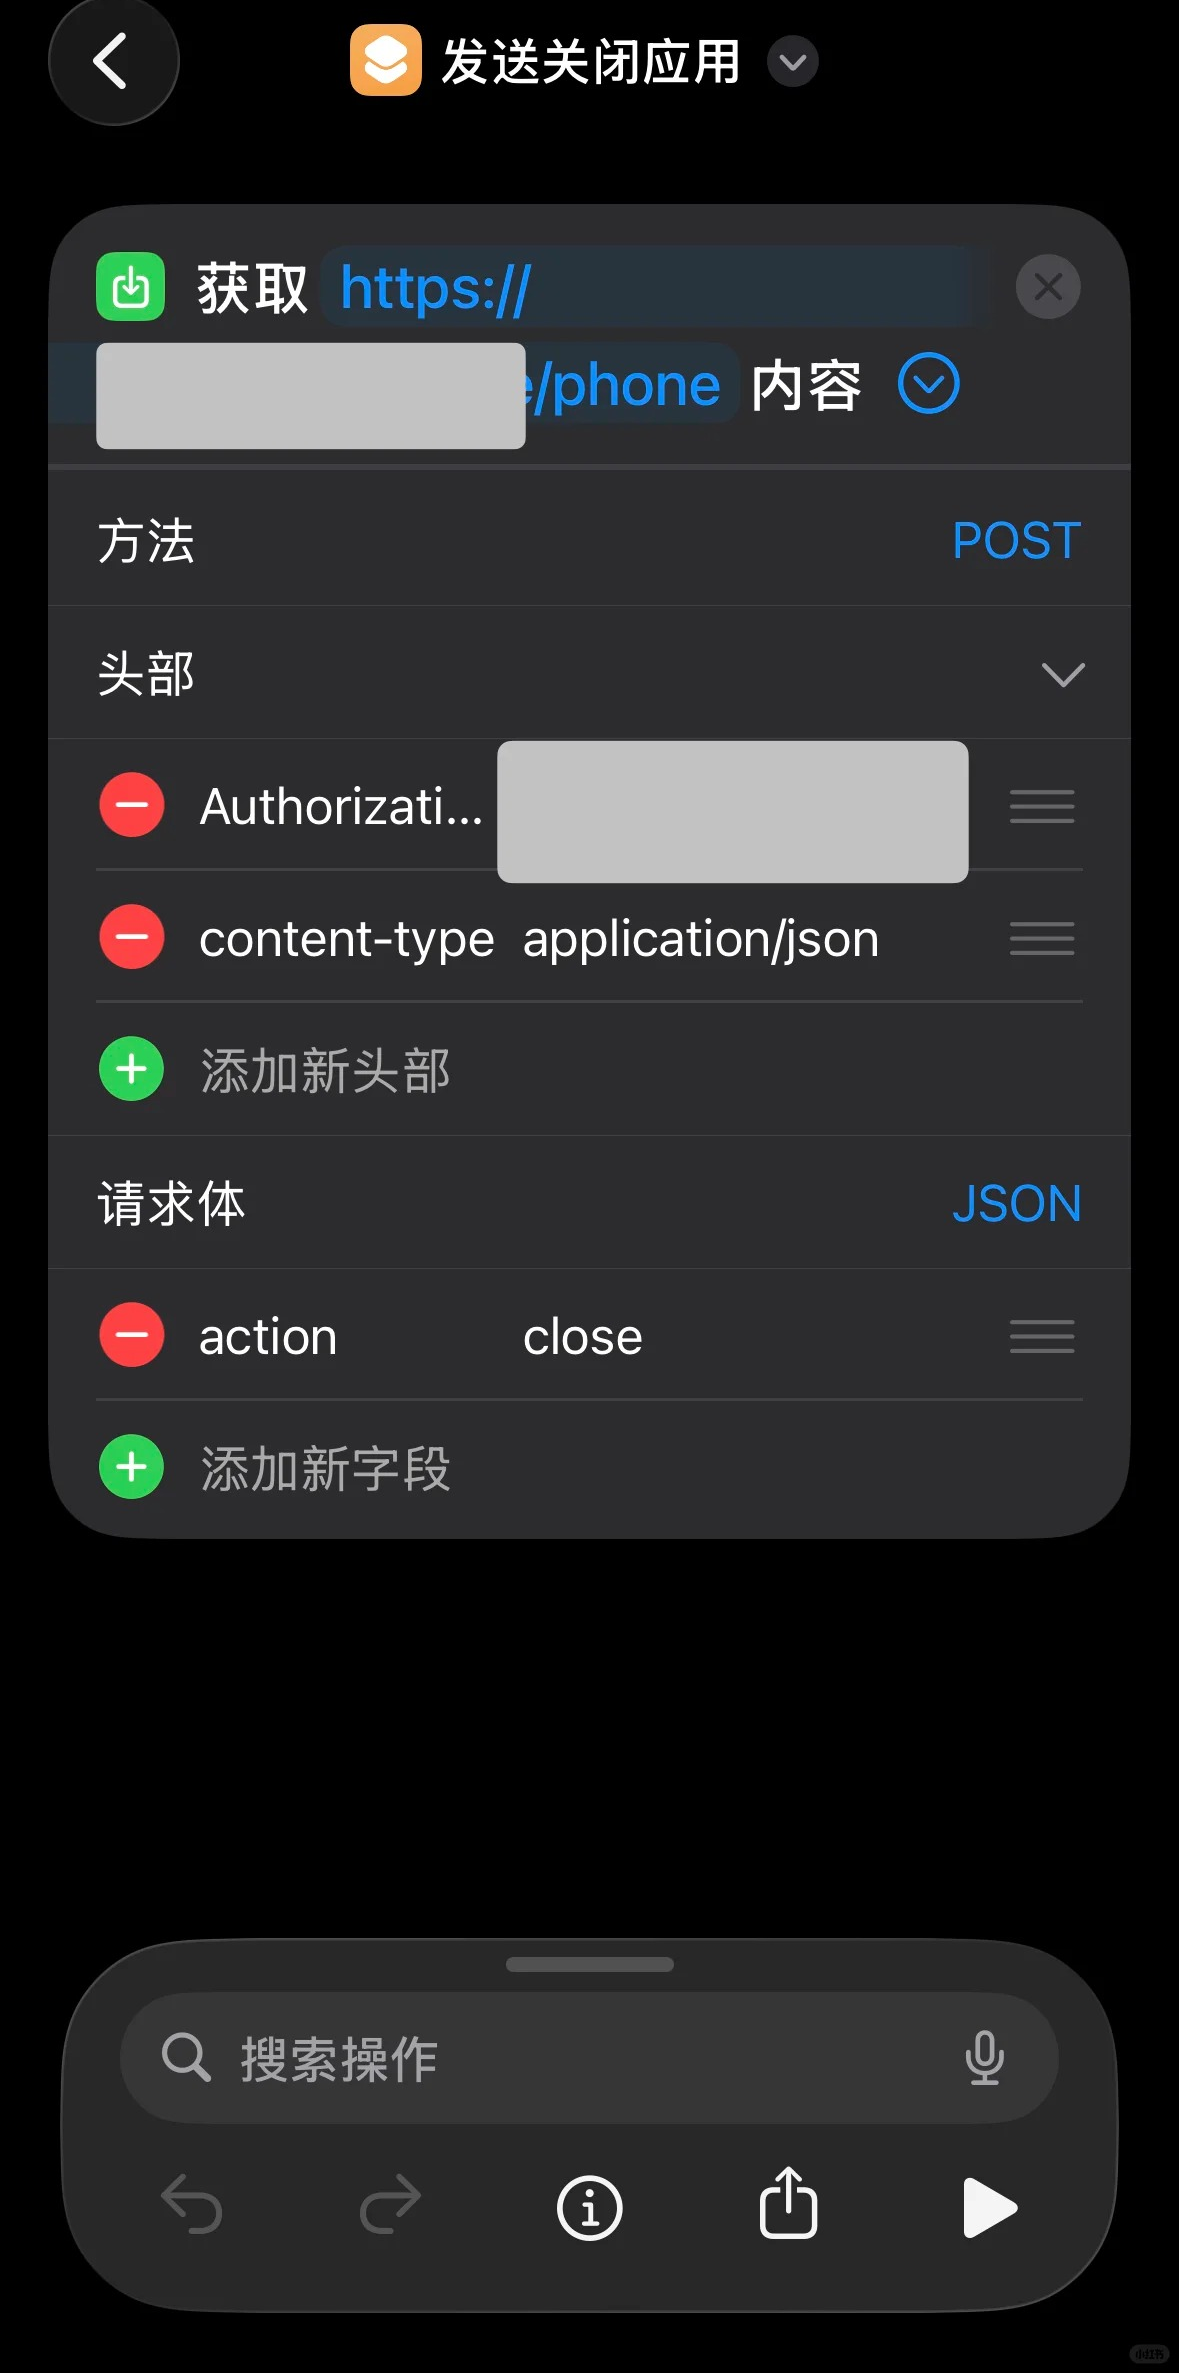
See reporters/ios for the full Shortcuts walkthrough and the
/api/devices/ios/app-event body shape.
Windows
- Drop the reporter
.exeon the machine (single-file, self-contained). - First run → tray icon → Settings:
- Server URL:
https://<host> - Token: the
windows-pctoken
- Server URL:
- Enable Start with Windows (writes an
HKCU\…\Runentry).
macOS
pip3 install -r requirements.txt(or use the packaged build once ported).- Grant Accessibility permission to the terminal/app running it (System Settings → Privacy & Security → Accessibility) — needed to read window titles.
- Edit
config.json→serverUrl+token(themac-laptoptoken). - Install as a launchd agent for auto-start (see
reporters/macosafter port).
Connect an MCP client
There are two ways to connect, depending on whether your AI client runs the MCP server locally (stdio) or connects to a remote URL (HTTP).
A. Local clients — stdio (Claude Desktop, Claude Code)
Run the bundled stdio MCP server where your client lives, pointed at the collector:
// Claude Desktop: claude_desktop_config.json
{
  "mcpServers": {
    "device-timeline": {
      "command": "node",
      "args": ["/abs/path/device-timeline-mcp/dist/mcp/server.js"],
      "env": { "MCP_API_BASE": "https://<your-host>" }
    }
  }
}
B. Remote clients — HTTP / /mcp (claude.ai, web)
The collector also serves a streamable-HTTP MCP endpoint at /mcp (same
service, same port — no extra process). Web clients like claude.ai can't use
stdio; they connect to a URL instead. Point your client's custom/remote MCP
connector at:
https://<your-domain>/mcp
- You bring your own domain: put the collector behind HTTPS (a reverse proxy / tunnel of your choice) and add it as a remote MCP connector in your client.
- claude.ai requires an HTTPS URL — a bare
http://IP:portwon't be accepted, so the reverse proxy is what makes this work. - The endpoint is unauthenticated by default (it exposes your own activity).
Either keep it behind something only you can reach, or set
MCP_HTTP_TOKENto require anAuthorization: Bearer <token>header. SetMCP_HTTP_ENABLED=falseto turn the endpoint off entirely.
Tools exposed (identical for both transports):
| tool | what it answers |
|---|---|
| device_status | what every device is doing right now (online, foreground app, battery) |
| device_timeline | chronological activity for a day (filterable by deviceId) |
| device_activity_summary | per-app screen-time totals for a day |
Read API (for your own frontends)
CORS is enabled (CORS_ORIGIN, default *). All timestamps are UTC ISO;
date= means a calendar day in DISPLAY_TZ (default Asia/Shanghai).
| endpoint | purpose |
|---|---|
| GET /health | liveness + schema version |
| GET /api/devices/current | latest state per device (+ appName, live text) |
| GET /api/devices/timeline-query?date=&deviceId=&limit= | activity list |
| GET /api/devices/activity-summary?date=&deviceId= | per-app totals |
| GET /api/app-labels | the raw appId → {name, desc} map |
| POST /api/devices/report | ingest (Android/desktop reporters, Bearer token) |
| POST /api/devices/ios/app-event | ingest iOS open/close (Bearer token) |
current / timeline responses include server-computed appName and live
(a natural-language phrase), so frontends don't need to reimplement the label
logic. The /console page is a working example.
Customizing app names
config/app-labels.json maps an appId (Android bundle id, Windows process
name, macOS bundle id, or iOS app name) to a friendly name + status phrase:
{ "tv.danmaku.bili": { "name": "哔哩哔哩", "desc": "正在刷 B站~" } }
Edit the file and save — the collector hot-reloads it (no restart, no
rebuild), because it's read from a mounted volume (./config). Unknown apps fall
back to a capitalized last path segment.
Data model
Two tables (see src/db/migrations.ts). Migrations are versioned via
PRAGMA user_version.
device_states— one row per device: current foreground app, last seen,extraJSON.device_activities— append-only runs of "same app, contiguous in time" (consecutive samples withinACTIVITY_GRACE_SECONDSare merged into one row).
The SQLite file lives on the ./data volume.
Retention (auto-cleanup)
Activity history is pruned automatically so the DB doesn't grow forever. The
collector deletes device_activities rows older than RETENTION_DAYS (default
60, ~2 months) on startup and once every 24h. device_states (one row per
device) is never pruned. Set RETENTION_DAYS=0 to disable cleanup and keep
everything.
Backups
Backups are intentionally left to you — everyone wants something different
(copy to another VPS, push to a remote database, object storage, etc.), so the
collector doesn't bake in a backup scheme. The DB is a single file on the
./data volume, so the simplest approach is copying it — ideally with
sqlite3 <db> '.backup <dest>' or VACUUM INTO <dest> for a consistent
snapshot while the server is running.
License
MIT.